Outline
Weekly Schedule
| Week | Module |
|---|---|
| 1 | CI/CD Introduction |
| 2 | Terraform as IaC Tool |
| 3 | Terraform Fundamentals |
| 4 | Terraform Fundamentals |
| 5 | Terraform & AWS |
| 6 | Modularity with Terraform Modules |
| 7 | Modularity with Terraform Modules |
| 8 | CloudFront, ACM, and Route53 |
| 9 | Reading Week |
| 10 | Serverless Architecture |
| 11 | Serverless Architecture |
| 12 | GitHub Actions |
| 13 | GitHub Actions |
| 14 | Docker Pipelines |
| 15 | Final |
Assesment
| Module | Weight |
|---|---|
| Assignment 01 | 20% |
| Assignment 02 | 20% |
| In-class Activities | 10% |
| Final | 50% |
CI/CD Introduction
What is CI/CD?
CI: Continuous integration (CI) is the practice of automating the integration of code changes from multiple contributors into a single software project. It’s a primary DevOps best practice, allowing developers to frequently merge code changes into a central repository where builds and tests then run. Automated tools are used to assert the new code’s correctness before integration. (source)
CD: Continuous deployment is a strategy for software releases wherein any code commit that passes the automated testing phase is automatically released into the production environment, making changes that are visible to the software's users. (source)
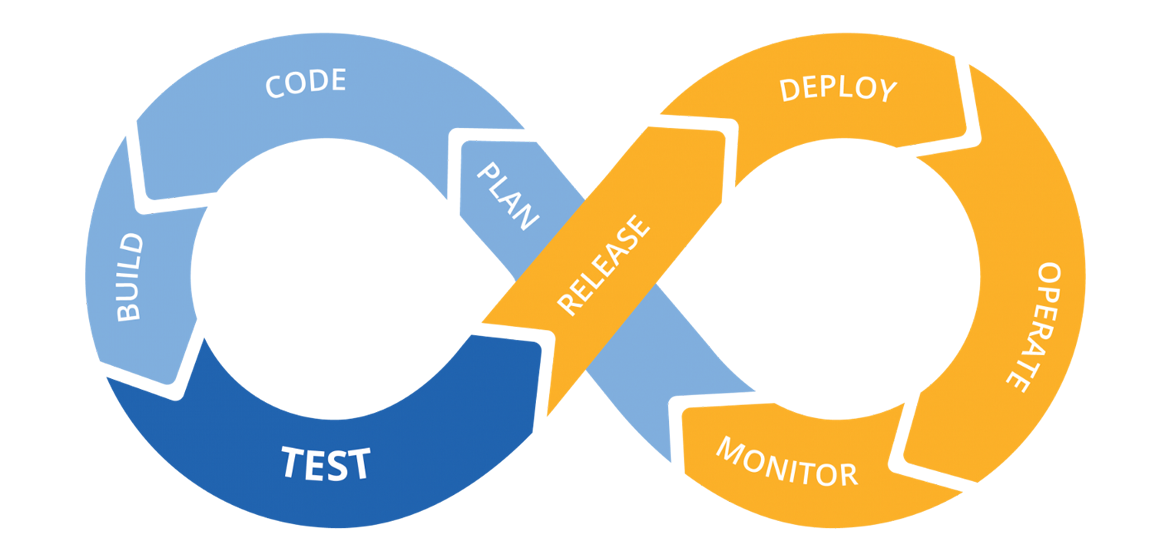
CI/CD in the Cloud
If your target is have your application in the cloud, then you will need to create your infrastructure first, and then have your code deployed.
One way to achieve this, is to manually create your infra in the cloud by, for example, going to the management console of your cloud provider and create resources manually (e.g. compute instances, databases, object storage, etc.). This traditional approach has various disadvantages:
- It’s difficult and time-consuming to repeat
- It’s difficult to roll-back in case of problems
- It has no validation or testing phase
- It has no history of previous changes
- It has no inherent documentation
Plus, as it’s done manually, it’s not possible to incorporate it in a CI/CD pipeline.
Infrastructure as Code
The idea behind infrastructure as code (IaC) is that you write and execute code to define, deploy, update, and destroy your infrastructure. This represents an important shift in mindset in which you treat all aspects of operations as software—even those aspects that represent hardware (e.g., setting up physical servers). In fact, a key insight of DevOps is that you can manage almost everything in code, including servers, databases, networks, log files, application configuration, documentation, automated tests, deployment processes, and so on.
The fact that infrastructure is defined in code makes it possible to be incorporated into a CI/CD pipeline and get all the benefits that it offers.
Popular IaC Tools
| Chef | Puppet | Ansible | Pulumi | CloudFormation | Heat | Terraform | |
|---|---|---|---|---|---|---|---|
| Source | Open | Open | Open | Open | Closed | Open | Open |
| Cloud | All | All | All | All | AWS | All | All |
| Type | Config Mgmt | Config Mgmt | Config Mgmt | Provisioning | Provisioning | Provisioning | Provisioning |
| Infra | Mutable | Mutable | Mutable | Immutable | Immutable | Immutable | Immutable |
| Paradigm | Procedural | Declarative | Procedural | Declarative | Declarative | Declarative | Declarative |
| Language | GPL | DSL | DSL | GPL | DSL | DSL | DSL |
| Master | Yes | Yes | No | No | No | No | No |
| Agent | Yes | Yes | No | No | No | No | No |
| Paid Service | Optional | Optional | Optional | Must-have | N/A | N/A | Optional |
| Community | Large | Large | Huge | Small | Small | Small | Huge |
| Maturity | High | High | Medium | Low | Medium | Low | Medium |
Getting Started with Terraform
Setting up an AWS Account
-
Refer to this document to set up your AWS account.
-
Refer to this document to create an IAM user. For simplicity, attach the
AdministratorAccessIAM policy to the user so we won't run into permission issues. Just as an FYI, this is against security best practices, but we will fix this later. -
Generate access key ID and secret access key for the user you created in the previous step. Refer to this [document] (https://docs.aws.amazon.com/powershell/latest/userguide/pstools-appendix-sign-up.html).
-
Install AWS CLI. Refer to this document.
-
Install AWS Vault from here.
Install Terraform
For MacOS:
brew tap hashicorp/tap
brew install hashicorp/tap/terraform
For Windows:
choco install terraform
Checkout the official documentation for other platforms.
Make sure terraform is installed:
terraform
Usage: terraform [global options] <subcommand> [args]

The available commands for execution are listed below.
The primary workflow commands are given first, followed by
less common or more advanced commands.

Main commands:
  init          Prepare your working directory for other commands
  validate      Check whether the configuration is valid
  plan          Show changes required by the current configuration
  apply         Create or update infrastructure
  destroy       Destroy previously-created infrastructure
...
Terraform needs to have access to your AWS credentials (the ones you created in the previous step). There are several ways to do this and we will cover most of them as we go forward.
For now, you can have your credentials as environment variables for Terraform to access them:
export AWS_ACCESS_KEY_ID=xxxxxxx
export AWS_SECRET_ACCESS_KEY=xxxxxx
Note that this approach only works in your current shell. If you open up a new shell, they'll be gone.
Another way is to use aws-vault which you installed in the previous step.
aws-vault exec dev -- terraform apply
Creating a Simple Server
Terraform code is written in the HashiCorp Configuration Language (HCL) in files with the extension .tf. It is a declarative language, so your goal is to describe the infrastructure you want, and Terraform will figure out how to create it. We'll start by deploying a simple server on AWS.
Start by creating a file named main.tf:
terraform {
  required_providers {
    aws = {
      version = ">= 4.0.0"
      source = "hashicorp/aws"
    }
  }
}
Download the AWS plugin for Terraform:
terraform init
This will download the required plugin and put it in the .terraform folder. We don't commit this folder to version control. So, let's make the current directory a git repo and add a .gitignore file to exclude the .terraform folder (along with other files and folders).
Initialize a git repo:
git init
Create a .gitignore file and set it up as discribed on this page.
Add a provider block to your main.tf to specify an AWS region:
provider "aws" {
  region = "ca-central-1"
}
Now it's time to add a resource. Resources in Terraform are declared as below:
resource "<PROVIDER>_<TYPE>" "<NAME>" {
  [CONFIG ...]
}
Where the PROVIDER is the plugin you're using (in this case, AWS); TYPE is the type of resource you want to create (in this case, EC2); NAME is the local name you give to the resource; and CONFIG is the arguments specific to the resource. Here's an example for an Ubuntu server in the ca-central-1 region.
resource "aws_instance" "example" {
  ami           = "ami-0b6937ac543fe96d7"
  instance_type = "t2.micro"

  tags = {
    Name = "bvc"
  }
}
Terraform binary contains a formatting tool to format your tool. It is highly recommended to do so, as it will improve readibility.
terraform fmt
Validate your code to catch any syntax errors withing your Terraform code:
terraform validate
If you get this message, you're good to go:
Success! The configuration is valid.
Before creating the instance, it's recommended to see what Terraform calls the Plan. It shows the changes to be made before actually making them. This is a great way to make sure we're not accidentally making a change we're not supposed to. See the plan with this command:
terraform plan
You should see an output similar to this:
Terraform will perform the following actions:

  # aws_instance.example will be created
  + resource "aws_instance" "example" {
      + ami                                  = "ami-0b6937ac543fe96d7"
      + arn                                  = (known after apply)
      + associate_public_ip_address          = (known after apply)
      + availability_zone                    = (known after apply)
      + cpu_core_count                       = (known after apply)
      + cpu_threads_per_core                 = (known after apply)
      + disable_api_stop                     = (known after apply)
      + disable_api_termination              = (known after apply)
      + ebs_optimized                        = (known after apply)
      + get_password_data                    = false
      + host_id                              = (known after apply)
      + host_resource_group_arn              = (known after apply)
      + id                                   = (known after apply)
      + instance_initiated_shutdown_behavior = (known after apply)
      + instance_state                       = (known after apply)
      + instance_type                        = "t2.micro"
      + ipv6_address_count                   = (known after apply)
...

Plan: 1 to add, 0 to change, 0 to destroy.
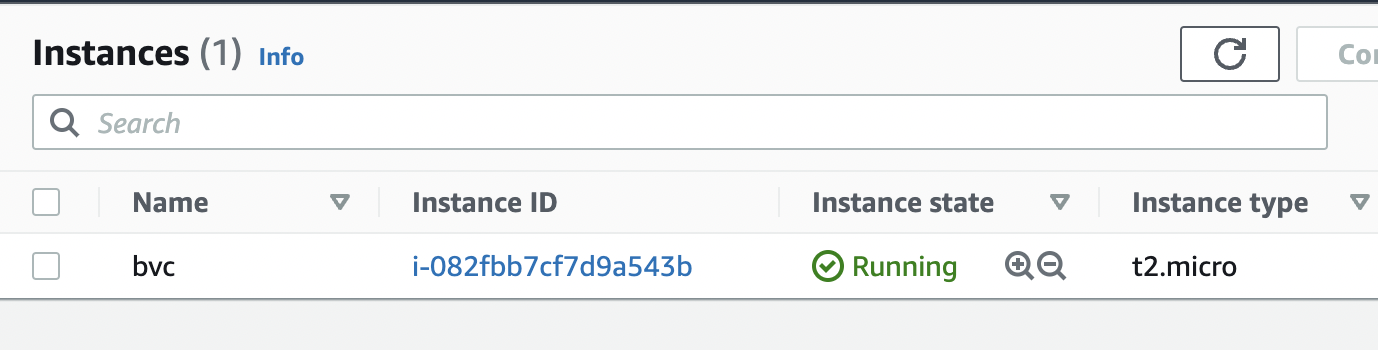
Once we're ok with the changes, we can apply them using terraform apply. This command will prompt you for one last time. In case you want to skip this prompt, run terraform apply --auto-approve.
After about 30 seconds, the instance is up and running.
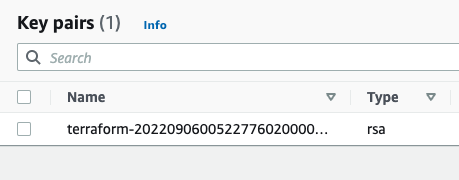
Next, we want to creat an AWS key pair so that we can SSH into the instance:
resource "tls_private_key" "key" {
  algorithm = "RSA"
  rsa_bits  = 4096

  provisioner "local-exec" {
    interpreter = ["bash", "-c"]
    command     = "echo '${self.private_key_pem}' > ${pathexpand("~/Downloads/canada.pem")}"
  }
}
The local-exec provisioner enables us to run a custom script on the machine that runs the Terraform code (in this case, our own machine). The script makes sure that we store the private key somewhere on our local file system so we can log in to the instance.
We need to also associate the key with the instance we create earlier:
resource "aws_instance" "example" {
  ami                    = "ami-0b6937ac543fe96d7"
  instance_type          = "t2.micro"
  key_name               = aws_key_pair.key_pair.key_name
}
After applying the changes, the key is created, yet we can't still SSH into the instance. The reason is that there's currently no security group attached to the instance that opens the SSH port for us. Let's add one:
data "aws_vpc" "default" {
  default = true
}

resource "aws_security_group" "allow_ssh_http" {
  name        = "allow_ssh_http"
  description = "Allows SSH and HTTP"
  vpc_id      = data.aws_vpc.default.id

  ingress {
    description = "SSH"
    from_port   = 22
    to_port     = 22
    protocol    = "tcp"
    cidr_blocks = ["0.0.0.0/0"]
  }

  ingress {
    description = "Allows HTTP"
    from_port   = 80
    to_port     = 80
    protocol    = "tcp"
    cidr_blocks = ["0.0.0.0/0"]
  }

  egress {
    from_port   = 0
    to_port     = 0
    protocol    = "-1"
    cidr_blocks = ["0.0.0.0/0"]
  }

  tags = {
    Name = "allow_ssh"
  }
}
The security group allows both SSH and HTTP (later we're installing a web server on the instance, so it's necessary to have HTTP as well).
As security groups belong to a VPC on AWS, we also need to grab the id of the default VPC that AWS creates for us in each region. The data block in Terraform enables us to do that. Note that the information we can get from a provider (in this case, AWS) depends on the provider itself and can be different from one provider to another. Don't forget to associate the security group with your instance:
resource "aws_instance" "example" {
  ami                    = "ami-0b6937ac543fe96d7"
  instance_type          = "t2.micro"
  key_name               = aws_key_pair.key_pair.key_name
  vpc_security_group_ids = [aws_security_group.allow_ssh_http.id]
  ...
}
After SSHing to the instance, we can now install an Apache web server:
sudo apt update
sudo apt install apache2
sudo systemctl start apache2
sudo systemctl enable apache2
Apache should now be running on the port 80 of the instance. In order to see the default Apache page, we would need the public IP of the instance. Although you can get that from the AWS console, let's output that using Terraform:
output "public_ip" {
  value = aws_instance.example.public_ip
}
You can now apply the changes and see the public IP address of the instance printed out in the console. Head to the IP address and you should be able to see the default Apache page.
Terraform Fundamentals
Using count to Create Multiple Instances of the Same Resource Type
One great thing about using an IaC tool like Terraform is the ability to reuse code. For instance, in order to create 2 more instances like the one we already created, we won't need to have any duplicate code in our Terraform configuration. Let's see how easy we can do that:
resource "aws_instance" "example" {
  count                  = 3 # number of instance
  ami                    = "ami-0b6937ac543fe96d7"
  instance_type          = "t2.micro"
  key_name               = aws_key_pair.key_pair.key_name
  vpc_security_group_ids = [aws_security_group.allow_ssh_http.id]

  tags = {
    Name = "bvc-${count.index + 1}" # using count.index to access the current index
  }
  ...
}
Adding the count field is all you would need. However, in order to distinguish between instances, we also changed the tags field to name the instances based on their index. There's also one gotcha here. Try to plan the changes and you'll get this error:
Error: Missing resource instance key
│
│   on main.tf line 88, in output "public_ip":
│   88:   value = aws_instance.example.public_ip
The reason is that now that we have 3 instances, there's no way for Terraform to decided whose public IP to output. To fix this, we use the Terraform splat ([*]) expression:
output "public_ip" {
  value = aws_instance.example[*].public_ip
}
This will tell Terraform to output the public IP of all the instances in a list. After applying the changes, you'll see 3 instances on the console (each with different names), and also 3 public IPs printed out to the console:
Outputs:

public_ip = [
  "3.96.65.93",
  "35.183.7.154",
  "15.223.46.185",
]

At the end, don't forget to destroy everything so you won't incure any cost:
terraform destroy
Variables
Variables, as in any programming language, are a means to change the logic of your Terraform configuration without changing the code. They also make your configurations DRY (Do not Repeat Yourself), meaning you can avoid repeating values over and over; and in case of any change, you would only need to change it in one place instead of many.
This is how to declare a variable in Terraform:
variable "image_id" {
  type = string
}
This declares a variable names image_id and sets the type of the variable to string. The type field introduces static typing in Terraform, meaning that later on, if, for instance, you try to put anything other than a string in the variable image_id, Terraform will give you an error.
All fields for declaring a varibale block is optional. Here are the optional fields:
default- A default value which then makes the variable optional.type- This argument specifies what value types are accepted for the variable.description- This specifies the input variable's documentation.validation- A block to define validation rules, usually in addition to type constraints.sensitive- Limits Terraform UI output when the variable is used in configuration.nullable- Specify if the variable can be null within the module.
Here are the supported value types for the type field in Terraform:
string: a sequence of Unicode characters representing some text, like"hello".number: a numeric value. Thenumbertype can represent both whole numbers like15and fractional values like6.283185.bool: a boolean value, eithertrueorfalse.boolvalues can be used in conditional logic.list(ortuple): a sequence of values, like["us-west-1a", "us-west-1c"]. Elements in a list or tuple are identified by consecutive whole numbers, starting with zero.map(orobject): a group of values identified by named labels, like{name = "Mabel", age = 52}.
Example of using a variable
Let's assume we wanted to assign a specific tag (created_by) to any AWS resource we create using Terrafrom. Here's how we could go about doing it:
variable "created_by" {
  type = string
}
Then in the resource block, we can use the variable for setting up tags:
tags = {
    Name = "bvc"
    create_by = var.created_by
}
Note how we can reference a variable in Terraform:
var.VARIABLE_NAME
Now if we go ahead and try to plan with the terraform plan command, we will be prompted to give the variable a value:
var.created_by
  Enter a value:
The reason for that is that Terraform has currently no other way to figure out the value we intend to give the variable created_by.
Different ways of initializing a variable
Other than being prompted by Terraform during plan and apply, we can give our variables a value in multiple ways:
- Using a default value with the help of the
defaultfield - Individually, with the
-varcommand line option. - In variable definitions (
.tfvars) files, either specified on the command line or automatically loaded. - As environment variables.
Using a default value
Any variable in Terraform can have a default value. Terraform will use the default value in case the variable is not set in any way. We use the default field of the variable block to set a default value for our variables:
variable "created_by" {
    type    = string
    default = "terraform"
}
Now, if you run terraform plan or terraform apply, Terraform won't ask you for a value for created_by, although we never set it anywhere. It will just use the default value terraform for those operations.
Using the -var command like option
We can pass a value to a variable during the plan and apply phase by using the -var command line option:
terraform apply -var="created_by=terraform"
This way, Terraform won't prompt us anymore.
Using a .tfvars file
We can also create a file with the extension .tfvars and pass it to the plan and apply command. The file will have the value for our variables. Let's create a file named my_values.tfvars with the following content:
created_by = "terraform"
Now we can pass it to the plan and apply command using the -var-file command line option:
terraform plan -var-file="my_values.tfvars"
Terraform also automatically loads (no need for using the -var-file option) a number of variable definitions files if they are present:
- Files named exactly
terraform.tfvarsorterraform.tfvars.json. - Any files with names ending in
.auto.tfvarsor.auto.tfvars.json.
Rename the my_values.tfvars to terraform.tfvars and Terraform won't prompt you for the value of created_by even if you omit the -var-file command line option.
Using environment variables
We can also use environment variables to pass the value for our variables. Terraform searches the environment of its own process for environment variables named TF_VAR_ followed by the name of a declared variable.
For example, we can set the value for the created_by variable using environment variables:
export TF_VAR_created_by=terrform
Now if you run terraform plan or terraform apply, Terraform will get the value from the environment and won't prompt you for it.
Terraform File Structure
So far, we've been putting everything in just one file: main.tf. Although this is fine for showing how Terraform works and for very small projects, it is not recommended. A better approach (one that Terraform also recommends), is to split the configuration into at least three different files (main.tf, variables.tf, and output.tf). It's important to note that separating the configuration does not have any impact on how Terraform works, it just gives it a better structure and makes it more readable. When you run any Terrafrom command, such as terraform plan, Terraform scans for every .tf file in the current directory and include them in the plan.
Let's have our configuration more structured by separating variables, outputs, and creating resources.
Create a file named variables.tf and move the declaration of the variables there:
variable "created_by" {
    type = string
}
Create another file named outputs.tf and move the outputs there:
output "public_ip" {
  value = aws_instance.example[*].public_ip
}
The rest of the configuration will stay in the main.tf file. Now, if you run terraform plan, nothing has changed. But we now have a much better structure for our configuration.
Variable Definition Precedence
What if we set different values for the same variable via different ways (both in environment variables and in terraform.tfvars file, for instance)? Terraform loads variables in the following order, with later sources taking precedence over earlier ones:
- Environment variables
- The
terraform.tfvarsfile, if present. - The
terraform.tfvars.jsonfile, if present. - Any
*.auto.tfvarsor*.auto.tfvars.jsonfiles, processed in lexical order of their filenames. - Any
-varand-var-fileoptions on the command line, in the order they are provided. (This includes variables set by a Terraform Cloud workspace.)
Managing Terraform State in a Team
So far, we've used the local storage for Terraform state (it's the terraform.tfstate file in the directory you have your Terraform configuration). However, if you remember, we added that file to our .gitignore file, meaning we're not checking it in to our repo. This means that anyone who pulls the latest changes from the repo, won't have the state file. This poses a serious problem!
When you try to run Terraform without the state file, Terraform assumes that you're building things for the first time and will try to create all the resources defined in the configuration, although the resources already exist in the cloud. So, we need a way to have a central location for storing the state file. A location that every member on your team can access. Terraform solves this problem with Backends.
Terraform Backends
Terraform supports several backends for storing the state file. Choosing one depends on your tech stack and the cloud provider you're using. Since we're using AWS, we'll choose an AWS backend which consists of an S3 bucket and a DynamoDB table. The S3 bucket will be used to store the actual state file, while the DynamoDB table will be used for locking the state. State locking is important when you're working as a team. It ensures that only one person can aquire the state and change it at any given time. Any additional attempt to change the state will fail, until the lock is released by the person who's using it. Locking prevents unexpected behaviour caused by multiple changes to the state file at the same file.
Here are some of the backends that Terraform supports:
- S3 (AWS offering)
- azurerm (Microsoft Azure offering)
- gcs (Google Cloud offering)
- remote (Terraform Cloud)
Create an S3 Backend
We use Terraform to create an S3 bucket and a DynamoDB table to create a backend. It's a best practice to have your backend config separate from your rest of the infrastructure. Here's one way to do it: create a separate folder named backend and the rest of your configuration in another folder named live or production.
project
└───backend
│   │   main.tf
└───live
    │   main.tf
    │   variables.tf
    │   outputs.tf
In the main.tf file inside the backend folder, put the following configuration:
terraform {
  required_providers {
    aws = {
      source = "hashicorp/aws"
    }
  }
}

provider "aws" {
  region = "ca-central-1"
}

resource "aws_s3_bucket" "terraform_state" {
  bucket = "bvc-terraform-state"
}

resource "aws_s3_bucket_acl" "example" {
  bucket = aws_s3_bucket.terraform_state.id
  acl    = "private"
}

resource "aws_s3_bucket_versioning" "bucket_version" {
  bucket = aws_s3_bucket.terraform_state.id
  versioning_configuration {
    status = "Enabled"
  }
}

resource "aws_s3_bucket_server_side_encryption_configuration" "example" {
  bucket = aws_s3_bucket.terraform_state.id

  rule {
    apply_server_side_encryption_by_default {
      sse_algorithm = "AES256"
    }
  }
}

resource "aws_dynamodb_table" "terraform_locks" {
  name           = "terraform-locks"
  billing_mode   = "PROVISIONED"
  read_capacity  = 1
  write_capacity = 1
  hash_key       = "LockID"

  attribute {
    name = "LockID"
    type = "S"
  }
}
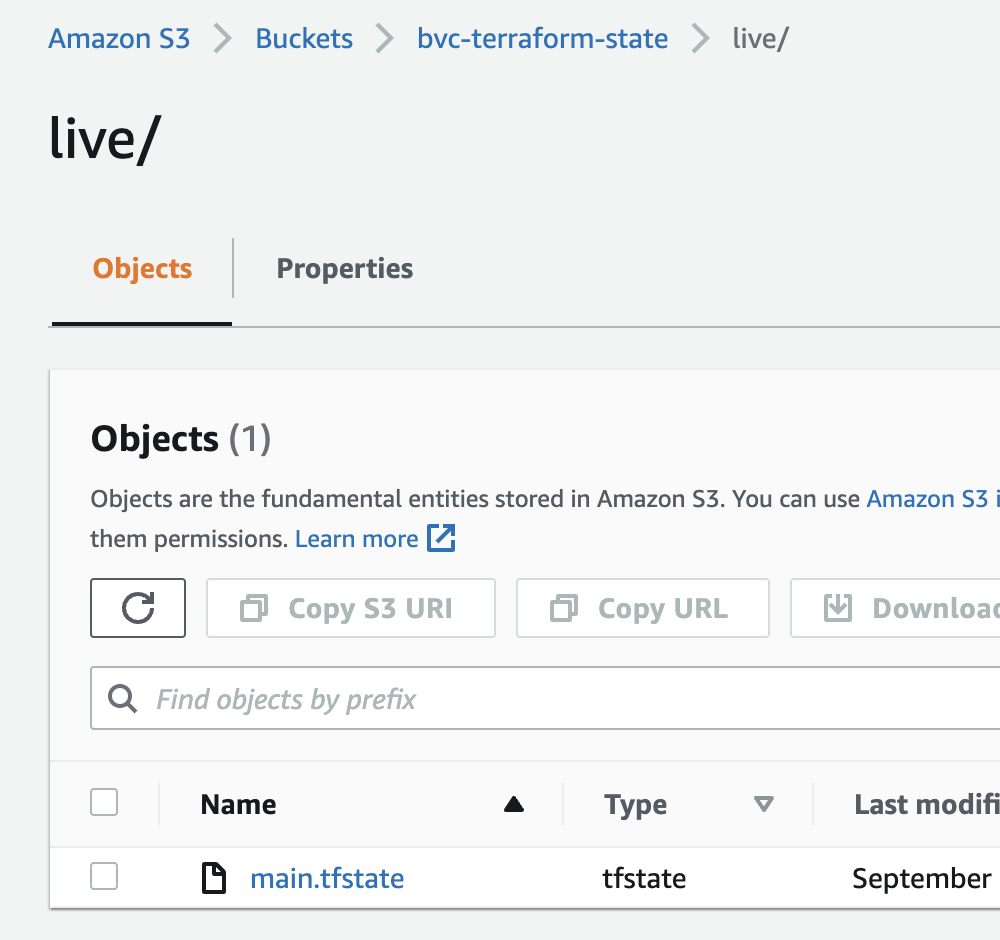
After init, plan, and apply, our S3 bucket and DynamoDB table is ready to serve as a backend. Open up your main.tf file inside the live folder and add the backend to the terraform block:
terraform {
  backend "s3" {
    bucket = "bvc-terraform-state"
    key    = "live/main.tfstate"
    region = "ca-central-1"

    dynamodb_table = "terraform-locks"
    encrypt        = true
  }
  required_providers {
    aws = {
      version = ">= 4.0.0"
      source  = "hashicorp/aws"
    }
  }
}
As with adding a provider, changing the backend also requires you to do a terraform init first. Go ahead and run terraform init. Note that because this command will now need to access the bucket and table on AWS, it DOES NEED credentials to do so. So, you would need to pass the credentials to the command in one of the ways we already discussed, such as aws-vault (aws-vault exec YOUR-PROFILE -- terraform init).
Terraform will ask you if you want to transfer the state to the remote backend. Type yes and in a few seconds, the backend is setup. Now, every changes that you make to the infrastructure will end up in the S3 bucket.
Hosting a Static Website
S3 can host a static website. You just need to change a few configurations on the bucket to turn an S3 bucket into a host for your website.
CodeBuild is a fully managed continuous integration service that compiles source code, runs tests, and produces software packages that are ready to deploy. In order to tell CodeBuild what to do and how to do things, we need to provide a special YAML file named buildspec.yaml. One of the great features of CodeBuild is its ability to run any code in the cloud environment. We will be using this feature to upload our website's content to S3. CodeBuild can also connect to a GitHub repo and listen to changes applied there. It can then run any code once a change is detected (like when you push a new update for your website).
With just S3 and CodeBuild, we can create a CI/CD pipeline to host a static website. We'll be demonstrating this first manually in the class. Then we'll be using Terraform to automate the process, so we can easily spin up a pipeline for any static website in a minute in the future. What follows next is the Terraform code needed for creating the pipeline.
main.tf
# create S3 bucket to host the website
resource "aws_s3_bucket" "site_bucket" {
  bucket = var.bucket_name
}

# make sure public access on the bucket is not blocked
resource "aws_s3_bucket_public_access_block" "this" {
  bucket = aws_s3_bucket.site_bucket.id

  block_public_acls       = false
  block_public_policy     = false
  ignore_public_acls      = false
  restrict_public_buckets = false
}

# create bucket policy to allow public read access
# without this, no one would be able to view the website
resource "aws_s3_bucket_policy" "allow_public_access" {
  bucket = aws_s3_bucket.site_bucket.id
  policy = <<POLICY
    {
    "Version": "2012-10-17",
    "Id": "Policy1664159397662",
    "Statement": [
        {
            "Sid": "Stmt1664159396184",
            "Effect": "Allow",
            "Principal": "*",
            "Action": "s3:GetObject",
            "Resource": "${aws_s3_bucket.site_bucket.arn}/*"
        }
    ]
}
  POLICY
}

# configure the S3 bucket as a statuc website
resource "aws_s3_bucket_website_configuration" "my_website" {
  bucket = aws_s3_bucket.site_bucket.id

  index_document {
    suffix = var.index_document
  }
}

# create a CodeBuild project
resource "aws_codebuild_project" "project" {
  name          = var.project_name
  build_timeout = "20"
  service_role  = aws_iam_role.cbuild_role.arn

  artifacts {
    type = "NO_ARTIFACTS"
  }

  environment {
    compute_type = "BUILD_GENERAL1_SMALL"
    image        = "aws/codebuild/standard:4.0"
    type         = "LINUX_CONTAINER"

    # passing the bucket name as an environment variable
    environment_variable {
      name  = "BUCKET_NAME"
      value = "s3://${var.bucket_name}"
    }
  }

  logs_config {
    cloudwatch_logs {
      group_name = "build-${var.project_name}"
    }
  }

  # set the source to our repo
  source {
    type            = "GITHUB"
    location        = var.repo_address
    git_clone_depth = 1
  }

  # set the branch name for the pipeline
  source_version = var.branch_name
}

# create a role for CodeBuild service to assume
resource "aws_iam_role" "cbuild_role" {
  name               = var.project_name
  assume_role_policy = <<EOF
{
  "Version": "2012-10-17",
  "Statement": [
    {
      "Effect": "Allow",
      "Principal": {
        "Service": "codebuild.amazonaws.com"
      },
      "Action": "sts:AssumeRole"
    }
  ]
}
EOF
}

# attach an IAM policy to CodeBuild role
# for accessing the S3 bucket
resource "aws_iam_role_policy" "this" {
  role = aws_iam_role.cbuild_role.name

  policy = <<POLICY
{
  "Version": "2012-10-17",
  "Statement": [
    {
      "Effect": "Allow",
      "Resource": [
        "*"
      ],
      "Action": [
        "logs:CreateLogGroup",
        "logs:CreateLogStream",
        "logs:PutLogEvents"
      ]
    },
    {
      "Effect": "Allow",
      "Action": [
        "s3:*"
      ],
      "Resource": ["${aws_s3_bucket.site_bucket.arn}", "${aws_s3_bucket.site_bucket.arn}/*"]
    }
  ]
}
POLICY
}

# create a webhook so the projects can detect
# changes in the repo and start a new build
# note that you need to remove this section (or comment out)
# and build whatever's above this resource first
# you then need to change the source section of the
# CodeBuild project to connect to your GitHub repo
# after that, you can create this resource
resource "aws_codebuild_webhook" "this" {
  project_name = aws_codebuild_project.project.name
  build_type   = "BUILD"

  filter_group {
    filter {
      type    = "EVENT"
      pattern = "PUSH"
    }

    filter {
      type    = "HEAD_REF"
      pattern = var.branch_name
    }
  }
}
variables.tf
variable "bucket_name" {
  type = string
}

variable "index_document" {
  type    = string
  default = "index.html"
}

variable "project_name" {
  type = string
}

variable "repo_address" {
  type = string
}

variable "branch_name" {
  type    = string
  default = "main"
}
terraform.tfvars
bucket_name  = "my-awesome-website-32989"
repo_address = "<REPO-LINK>"
project_name = "awesome-website"
outputs.tf
# output the address of the static website
output "website_address" {
  value = aws_s3_bucket_website_configuration.my_website.website_endpoint
}
versions.tf
terraform {
  required_providers {
    aws = {
      source = "hashicorp/aws"
    }
  }
}

provider "aws" {
  region = "ca-central-1"
}
buildspec.yml
version: 0.2

phases:
  build:
    commands:
      - aws s3 sync . $BUCKET_NAME --exclude ".git/*"
  post_build:
    commands:
      - echo Success!
Modularity with Terraform Modules
In order to keep your configurations clean and easy to read, you should avoid code duplication. In a programming language, such as Python and Go, you can do so by putting the code you want to reuse in a function. For example:
func avg(numbers ...int) int {
    var sum int

    for _, number := range numbers {
        sum += number
    }

    return sum/len(numbers)
}

func main() {
    var average int

    average = avg(1, 2, 3, 4, 5)
    fmt.Println("average is", average)

    // using the avg function instead of duplicating the average logic
    average = avg(1, 2, 3, 4, 5, 9, 10, 18)
    fmt.Println("average is", average)

    // using the avg function instead of duplicating the average logic
    average = avg(1, 2, 3, 4, 5, 9, 10, 18, 87, 90, 23)
    fmt.Println("average is", average)
}
We have the same concept in Terraform as well. Terraform calls them modules instead of functions.
A Terraform module is any number of Terraform configuration files (.tf files) in a folder. Modules, just like function, can accept inputs using Terraform variables, and can also return values using Terraform outputs. Hence, a typical module structure contains these 3 files:
main.tf(function code in a programming context)variables.tf(function inputs in a programming context)outputs.tf(function returns/ouputs in a programming context)
It's important to note that modules on their own do not create any resources unless the root module (the module with the terraform and provider blocks) use them. Just as a function won't do anything unless the main function calls and uses it.
Here's an example for creating multiple S3 buckets with versioning and encryption enabled. We use a module to create the bucket so that we don't have to repeat ourselves. The module receives one input (via the variables.tf file) named bucket_name and return one value (via the outputs.tf file) named bucket_arn which is the Amazon Resource name of the bucket.
Here's the directory structure of our configurations:
infra
└───modules
|   └───s3_version_encryption
│       │   main.tf
│       │   variables.tf
│       │   outputs.tf
│   main.tf
│   variables.tf
│   outputs.tf
│   versions.tf
modules/s3_version_encryption/main.tf
resource "aws_s3_bucket" "my_bucket" {
  bucket = var.bucket_name
}

resource "aws_s3_bucket_versioning" "versioning" {
  bucket = aws_s3_bucket.my_bucket.id

  versioning_configuration {
    status = "Enabled"
  }
}

resource "aws_s3_bucket_server_side_encryption_configuration" "encryption" {
  bucket = aws_s3_bucket.my_bucket.id

  rule {
    apply_server_side_encryption_by_default {
      sse_algorithm = "AES256"
    }
  }
}
modules/s3_version_encryption/variables.tf
variable "bucket_name" {
 type = string
}
modules/s3_version_encryption/outputs.tf
output "bucket_arn" {
 value = aws_s3_bucket.my_bucket.arn
}
main.tf
module "s3_1" {
  source = "./modules/s3_version_encryption"
  bucket_name = "bucket_1_7873847384"
}

module "s3_2" {
  source = "./modules/s3_version_encryption"
  bucket_name = "bucket_2_90328327788"
}
outputs.tf
# note how we are addressing the output from a module
output "bucket_1_arn" {
  value = module.s3_1.bucket_arn
}

output "bucket_2_arn" {
  value = module.s3_2.bucket_arn
}
versions.tf
terraform {
  required_providers {
    aws = {
      source = "hashicorp/aws"
    }
  }
}

provider "aws" {
  region = "ca-central-1"
}
variables.tf
# nothing here
After adding a module, you must run terraform init first in order to download the modules. Here, we have our modules locally in our system, but Terraform still needs to map the module you're using to the source code of the module whether it's on your system or on a remote repository. So, don't forget to run terraform init first, otherwise, you'll run into errors.
And as easy as that, now you have a re-usable module to create an S3 bucket with versioning and encryption enabled. All you have to do is to pass a unique name for your S3 bucket. Our configuration is DRY and clean and easy to read.
You will find the above configuration code in the repo.
CloudFront, ACM, and Route 53
In this lecture we're going to create a public certificate with AWS ACM, use it to distribute our static website using AWS CloudFront, and assign a domain name to our website using AWS Route53.
NOTE: You need a valid domain to follow along which will cost you. Plus, Route53 is not covered under the Free Tier and you'll have to pay for it as well (USD 1).
First an overview of the services we'll be using:
CloudFront
Amazon CloudFront is a web service that speeds up distribution of your static and dynamic web content, such as .html, .css, .js, and image files, to your users. CloudFront delivers your content through a worldwide network of data centers called edge locations. When a user requests content that you're serving with CloudFront, the request is routed to the edge location that provides the lowest latency (time delay), so that content is delivered with the best possible performance. (more here)
ACM
AWS Certificate Manager (ACM) is a service that lets you easily provision, manage, and deploy public and private Secure Sockets Layer/Transport Layer Security (SSL/TLS) certificates for use with AWS services and your internal connected resources. SSL/TLS certificates are used to secure network communications and establish the identity of websites over the Internet as well as resources on private networks. AWS Certificate Manager removes the time-consuming manual process of purchasing, uploading, and renewing SSL/TLS certificates.
With AWS Certificate Manager, you can quickly request a certificate, deploy it on ACM-integrated AWS resources, such as Elastic Load Balancing, Amazon CloudFront distributions, and APIs on Amazon API Gateway, and let AWS Certificate Manager handle certificate renewals. It also enables you to create private certificates for your internal resources and manage the certificate lifecycle centrally. Public and private certificates provisioned through AWS Certificate Manager for use with ACM-integrated services are free. You pay only for the AWS resources you create to run your application. (source)
Route53
Amazon Route 53 is a highly available and scalable Domain Name System (DNS) web service. You can use Route 53 to perform three main functions in any combination: domain registration, DNS routing, and health checking. (more here)
Demo
We're going to first manually do this in the class, and then via Terraform and CodeBuild.
Using Terraform
We need to first change the module we created in the previous lecture a little bit. We need to have a new output (S3 domain name), and also add a new policy so CodeBuild can create a CloudFront distribution.
modules/static_website/outputs.tf
output "bucket_regional_domain_name" {
  value = aws_s3_bucket.site_bucket.bucket_regional_domain_name
}
modules/static_website/main.tf
# attach an IAM policy to CodeBuild role
# for accessing the S3 bucket
resource "aws_iam_role_policy" "this" {
  role = aws_iam_role.cbuild_role.name

  policy = <<POLICY
{
  "Version": "2012-10-17",
  "Statement": [
    {
      "Effect": "Allow",
      "Resource": [
        "*"
      ],
      "Action": [
        "logs:CreateLogGroup",
        "logs:CreateLogStream",
        "logs:PutLogEvents"
      ]
    },
    {
      "Effect": "Allow",
      "Action": [
        "s3:*"
      ],
      "Resource": ["${aws_s3_bucket.site_bucket.arn}", "${aws_s3_bucket.site_bucket.arn}/*"]
    },
    {
      "Effect": "Allow",
      "Action": [
        "cloudfront:*"
      ],
      "Resource": ["*"]
    }
  ]
}
POLICY
}
For the root module:
main.tf
module "static_website_1" {
  source = "./modules/static_website"

  bucket_name  = var.bucket_name
  repo_address = var.repo_address
  project_name = var.project_name
}

# locals work pretty much like variables
# they're mainly used to store long expressions
# so we can avoid typing them over and over
locals {
  origin_id   = module.static_website_1.bucket_regional_domain_name
  domain_name = var.domain_name
}

# create a CloudFront distribution
resource "aws_cloudfront_distribution" "s3_distribution" {
  origin {
    domain_name = module.static_website_1.bucket_regional_domain_name
    # this id can be anything
    origin_id   = local.origin_id
  }

  enabled = true

  restrictions {
    geo_restriction {
      restriction_type = "none"
    }
  }

  default_cache_behavior {
    allowed_methods  = ["GET", "HEAD"]
    cached_methods   = ["GET", "HEAD"]
    target_origin_id = local.origin_id

    forwarded_values {
      query_string = false

      cookies {
        forward = "none"
      }
    }

    # redirect everything to HTTPS
    viewer_protocol_policy = "redirect-to-https"
    min_ttl                = 1
    default_ttl            = 86400
    max_ttl                = 31536000
    compress               = true
  }

  # the least expensive class
  price_class = "PriceClass_100"

  aliases = [local.domain_name]

  # default entry page of the website
  default_root_object = "index.html"

  viewer_certificate {
    acm_certificate_arn      = aws_acm_certificate.cert.arn
    ssl_support_method       = "sni-only"
    minimum_protocol_version = "TLSv1.2_2021"
  }
}

# request an ACM certificate
# note that the certificate needs to be in
# the `us-east-1` region for CloudFront to fetch it
resource "aws_acm_certificate" "cert" {
  domain_name               = local.domain_name
  validation_method         = "DNS"
  subject_alternative_names = ["*.${local.domain_name}"]

  # note the use of provider here
  # that uses an alias to point to another region
  provider = aws.us_east_1
}

# get the hosted zone associated with our domain
data "aws_route53_zone" "my_zone" {
  name         = local.domain_name
  private_zone = false
}

# add DNS records for certificate validation
resource "aws_route53_record" "alias_record" {
  for_each = {
    for dvo in aws_acm_certificate.cert.domain_validation_options : dvo.domain_name => {
      name   = dvo.resource_record_name
      record = dvo.resource_record_value
      type   = dvo.resource_record_type
    }
  }

  allow_overwrite = true
  name            = each.value.name
  records         = [each.value.record]
  ttl             = 60
  type            = each.value.type
  zone_id         = data.aws_route53_zone.my_zone.zone_id
}

# validate the certificate using DNS records
# validation needs to be in the same region as
# the certificate
resource "aws_acm_certificate_validation" "acm_validation" {
  certificate_arn         = aws_acm_certificate.cert.arn
  validation_record_fqdns = [for record in aws_route53_record.alias_record : record.fqdn]

  # note the use of provider here
  # that uses an alias to point to another region
  provider = aws.us_east_1
}

# create an alias for our CloudFront distribution
# alias records can map a domain to an AWS service
# they're also free of charge
resource "aws_route53_record" "www" {
  zone_id = data.aws_route53_zone.my_zone.zone_id
  name    = local.domain_name
  type    = "A"

  alias {
    name                   = aws_cloudfront_distribution.s3_distribution.domain_name
    zone_id                = aws_cloudfront_distribution.s3_distribution.hosted_zone_id
    evaluate_target_health = true
  }
}
variables.tf
variable "bucket_name" {
  type = string
}

variable "project_name" {
  type = string
}

variable "repo_address" {
  type = string
}

variable "domain_name" {
  type = string
}
outputs.tf
# we need the distribution id for invalidations
output "distribution_id" {
  value = aws_cloudfront_distribution.s3_distribution.id
}
versions.tf
terraform {
  required_providers {
    aws = {
      source = "hashicorp/aws"
    }
  }
}

provider "aws" {
  region = "ca-central-1"
}

# using the same provider for a different region
# using `alias`, we can have multiple configuration
# of the same provider
provider "aws" {
  region = "us-east-1"
  alias  = "us_east_1"
}
buildspec File
Finally, we need to add an invalidation command to our buildspec.yml so every change invalidates the distribution. This will make sure that users always see the latest version.
buildspec.yml
version: 0.2
phases:
  build:
    commands:
      - aws s3 sync . $BUCKET_NAME --exclude ".git/*"
      - aws cloudfront create-invalidation --distribution-id <DIST_ID> --paths "/*"
  post_build:
    commands:
      - echo Success!
Serverless Architecture with Lambda
First, create a Terraform module for a Lambda function and its pipeline using CodeBuild:
modules/lambda-pipeline/main.tf
# create a role for the function to assume
# see the docs: https://registry.terraform.io/providers/hashicorp/aws/latest/docs/resources/iam_role
resource "aws_iam_role" "iam_for_lambda" {
  name = "iam_for_lambda_${var.function_name}"

  assume_role_policy = <<EOF
{
  "Version": "2012-10-17",
  "Statement": [
    {
      "Action": "sts:AssumeRole",
      "Principal": {
        "Service": "lambda.amazonaws.com"
      },
      "Effect": "Allow",
      "Sid": ""
    }
  ]
}
EOF
}

locals {
  environment_map = var.env_vars == null ? [] : [var.env_vars]
  artifact_key = "artifact.zip"
}

# create a Lambda function
# see the docs: https://registry.terraform.io/providers/hashicorp/aws/latest/docs/resources/lambda_function
resource "aws_lambda_function" "lambda_func" {
  s3_bucket     = var.s3_bucket
  s3_key        = "${var.s3_key_prefix}/${local.artifact_key}"
  function_name = var.function_name
  role          = aws_iam_role.iam_for_lambda.arn
  handler       = var.handler

  dynamic "environment" {
    for_each = local.environment_map
    content {
      variables = environment.value
    }
  }

  # see all available runtimes here: https://docs.aws.amazon.com/lambda/latest/dg/API_CreateFunction.html#SSS-CreateFunction-request-Runtime
  runtime = var.runtime
}

# create a policy for publishing logs to CloudWatch
# and reading messages from SQS
resource "aws_iam_policy" "lambda_logging" {
  name        = "lambda_logging_${var.function_name}"
  description = "IAM policy for logging from a lambda and receiving SQS messages"

  policy = <<EOF
{
  "Version": "2012-10-17",
  "Statement": [
    {
      "Action": [
        "logs:CreateLogGroup",
        "logs:CreateLogStream",
        "logs:PutLogEvents"
      ],
      "Resource": "arn:aws:logs:*:*:*",
      "Effect": "Allow"
    }
  ]
}
EOF
}

# attach the above policy to the function role
# see the docs: https://registry.terraform.io/providers/hashicorp/aws/latest/docs/resources/iam_role_policy_attachment
resource "aws_iam_role_policy_attachment" "lambda_logs" {
  role       = aws_iam_role.iam_for_lambda.name
  policy_arn = aws_iam_policy.lambda_logging.arn
}

########## CodeBuild #########

# create a CodeBuild project
resource "aws_codebuild_project" "project" {
  name          = "build-${var.function_name}"
  build_timeout = "20"
  service_role  = aws_iam_role.cbuild_role.arn

  artifacts {
    type = "NO_ARTIFACTS"
  }

  environment {
    compute_type = "BUILD_GENERAL1_SMALL"
    image        = "aws/codebuild/standard:6.0"
    type         = "LINUX_CONTAINER"

    environment_variable {
      name  = "BUCKET_NAME"
      value = var.s3_bucket
    }

    environment_variable {
      name  = "KEY_PREFIX"
      value = var.s3_key_prefix
    }

    environment_variable {
      name  = "ARTIFACT_KEY"
      value = local.artifact_key
    }

    environment_variable {
      name  = "FUNC_NAME"
      value = var.function_name
    }
  }

  logs_config {
    cloudwatch_logs {
      group_name = "build-${var.function_name}"
    }
  }

  # set the source to our repo
  source {
    type            = "GITHUB"
    location        = var.repo_address
    git_clone_depth = 1
  }

  # set the branch name for the pipeline
  source_version = var.branch_name
}

# create a role for CodeBuild service to assume
resource "aws_iam_role" "cbuild_role" {
  name               = "role-build-${var.function_name}"
  assume_role_policy = <<EOF
{
  "Version": "2012-10-17",
  "Statement": [
    {
      "Effect": "Allow",
      "Principal": {
        "Service": "codebuild.amazonaws.com"
      },
      "Action": "sts:AssumeRole"
    }
  ]
}
EOF
}

# attach an IAM policy to CodeBuild role
# for accessing the S3 bucket
resource "aws_iam_role_policy" "this" {
  role = aws_iam_role.cbuild_role.name

  policy = <<POLICY
{
  "Version": "2012-10-17",
  "Statement": [
    {
      "Effect": "Allow",
      "Resource": [
        "*"
      ],
      "Action": [
        "logs:CreateLogGroup",
        "logs:CreateLogStream",
        "logs:PutLogEvents"
      ]
    },
    {
      "Effect": "Allow",
      "Action": [
        "s3:*"
      ],
      "Resource": ["${var.s3_bucket_arn}", "${var.s3_bucket_arn}/*"]
    },
    {
      "Effect": "Allow",
      "Action": [
        "lambda:UpdateFunctionCode"
      ],
      "Resource": ["${aws_lambda_function.lambda_func.arn}"]
    }
  ]
}
POLICY
}

# create a webhook so the projects can detect
# changes in the repo and start a new build
# note that you need to remove this section (or comment out)
# and build whatever's above this resource first
# you then need to change the source section of the
# CodeBuild project to connect to your GitHub repo
# after that, you can create this resource
resource "aws_codebuild_webhook" "this" {
  project_name = aws_codebuild_project.project.name
  build_type   = "BUILD"

  filter_group {
    filter {
      type    = "EVENT"
      pattern = "PUSH"
    }

    filter {
      type    = "HEAD_REF"
      pattern = var.branch_name
    }
  }
}
modules/lambda-pipeline/variables.tf
variable "function_name" {
  type = string
}

variable "s3_bucket" {
  type = string
}

variable "s3_bucket_arn" {
  type = string
}

variable "s3_key_prefix" {
  type = string
  default = "artifact.zip"
}

variable "handler" {
  type    = string
  default = "main.handler"
}

variable "runtime" {
  type    = string
  default = "python3.8"
}

variable "env_vars" {
  type    = map(any)
  default = null
}

variable "repo_address" {
  type    = string
}

variable "branch_name" {
  type    = string
  default = "main"
}
Then in the root module:
main.tf
resource "aws_s3_bucket" "name" {
}

module "python_lambda" {
    source = "./modules/lambda-pipeline"
    function_name = "python-test"
    s3_bucket = aws_s3_bucket.name.bucket
    s3_bucket_arn = aws_s3_bucket.name.arn
    s3_key_prefix = "python-test"
    repo_address = "<REPO>"
}

module "go_lambda" {
    source = "./modules/lambda-pipeline"
    function_name = "go-test"
    s3_bucket = aws_s3_bucket.name.bucket
    s3_bucket_arn = aws_s3_bucket.name.arn
    s3_key_prefix = "go-test"
    repo_address = "<REPO>"
    runtime = "go1.x"
    handler = "main"
}
CodeBuild Configs
For a Python Lambda function without any dependencies:
buildspec.yaml
version: 0.2
phases:
  install:
    runtime-versions:
      python: latest
    commands:
      - echo "installing..."

  build:
    commands:
      - echo "building..."

  post_build:
    commands:
      - echo "updating function $FUNC_NAME"
      - zip $ARTIFACT_KEY *.py
      - aws s3 cp $ARTIFACT_KEY s3://$BUCKET_NAME/$KEY_PREFIX/$ARTIFACT_KEY
      - aws lambda update-function-code --function-name $FUNC_NAME --s3-bucket $BUCKET_NAME --s3-key $KEY_PREFIX/$ARTIFACT_KEY
And for a Go Lambda function with or without dependencies:
buildspec.yaml
version: 0.2
phases:
  install:
    runtime-versions:
      golang: latest
    commands:
      - echo "installing..."

  build:
    commands:
      - echo "building..."
      - export GOOS=linux
      - export GOARCH=amd64
      - go build -o main .

  post_build:
    commands:
      - echo "updating function $FUNC_NAME"
      - zip $ARTIFACT_KEY main
      - aws s3 cp $ARTIFACT_KEY s3://$BUCKET_NAME/$KEY_PREFIX/$ARTIFACT_KEY
      - aws lambda update-function-code --function-name $FUNC_NAME --s3-bucket $BUCKET_NAME --s3-key $KEY_PREFIX/$ARTIFACT_KEY
GitHub Actions
GitHub actions allow you to automate your software development and delivery process right from the place you store your code. It lets you Build, Test, and Deploy your applications. It has a generous free-tier that you most likely won't cross. So, it's free and powerful.
GitHub actions can help you automate different phases of software development and delivery. As mentioned above, theres phases usually include Build, Test, and Deploy.
GitHub Actions have 4 main sections:
- Event (such as Push and Pull Requests)
- Job (a series of steps with a shared purpose)
- Steps (phases of a job that need to happen one after another)
- Actions/Command (code or commands that need to be executed in a particular step)
GitHub actions must be inside your repo, under this folder: .github/workflows.
GitHub Action to make sure Python code is formatted
Python doesn't have an official formatter, so here we're using a popular one named black (it doesn't matter really. you can choose something else). In this action, we want to maker sure that anyone who makes a Pull Request (PR), has already formatted their code with black. If not, the action will fail and let us know that the PR should not be merged:
# any name you want for the action
name: automation

# which events trigger this action
# here we're saying pull requests to the `main` branch only
on:
  pull_request:
    branches:
      - main

# you can have one or more jobs
jobs:
    # job name
  format:
    # an instance to run the job on
    runs-on: ubuntu-latest
    # steps start here
    steps:
    # this step uses an action from the community to checkout the repo
    # it will download the repo on the instance running the job
      - name: GitHub checkout
        uses: actions/checkout@v2

    # this step runs a command to install `black`
      - name: Install black
        run: pip install black==22.*

    # finally, this step checks to see if all the files
    # are properly formatted
      - name: Run black
        run: black . --check
You can put the above workflow with any name under .github/workflows.
As mentioned above, GitHub Actions can have more than one job in a single workflow. Let's add another one.
GitHub Action to run our tests (Python)
As explained in the other class, we can use pytest to test our Python code. Let's add another job to the workflow above to do that.
...
  test:
    runs-on: ubuntu-latest
    steps:
      - name: GitHub checkout
        uses: actions/checkout@v2

      - name: Install Pytest
        run: pip install pytest

      - name: Run Tests
        run: python -m pytest
GitHub Action to make sure Go code is formatted
Go, fortunately, comes with a formatter baked into the language tools (gofmt). In this action, we're using the tool to make sure all the files are properly formatted.
name: automation

on:
  pull_request:
    branches:
      - main

jobs:
  format:
    runs-on: ubuntu-latest
    steps:
      - name: GitHub checkout
        uses: actions/checkout@v2

      # we need to install Go as it doesn't come pre-installed in the instance
      - name: Set up Go
        uses: actions/setup-go@v2
        with:
          go-version: 1.19

      # run a little script to see if any files is not formatted
      - name: Run gofmt
        run: if [ "$(gofmt -l . | wc -l)" -gt 0 ]; then exit 1; fi
GitHub Action to run our tests (Go)
  test:
    runs-on: ubuntu-latest
    steps:
      - name: GitHub checkout
        uses: actions/checkout@v2

      - name: Set up Go
        uses: actions/setup-go@v2
        with:
          go-version: 1.19

      - name: Run Tests
        run: go test -v ./...
GitHub Actions & AWS
So far, everything we've done wasn't related to AWS. In order to make changes on AWS (such as uploading a file to S3 or updating a Lambda function code), you need to give GitHub permission to do that. There are basically two ways to do this:
- Creating an IAM user and giving GitHub the access key id and secret access key
- Creating an IAM role and giving GitHub the role ARN
But regardless of the approach, we're going to use a GitHub action built by AWS to give our action access to do things on our behalf. Here the link to the action.
Using AWS credentials
For this approach, you need to create an IAM user and then generate programming credentials for it to get the access key id and secret access key (the same way you setup aws cli or aws-vault). After generating the keys, you can add this step to your action:
- name: Configure AWS Credentials
  uses: aws-actions/configure-aws-credentials@v1
  with:
      aws-access-key-id: <access-key-id>
      aws-secret-access-key: <secret-access-key>
      aws-region: ca-central-1
Any step after that will have the permissions associated with the IAM user whose credentials are used here. For example, you can have a step like this after that:
- name: Copy files to the test website with the AWS CLI
  run: |
      aws s3 sync . s3://my-s3-test-website-bucket
Note that you will need to add these permission on the workflow level too so that GitHub can request a token from AWS:
permissions:
  id-token: write # This is required for requesting the JWT
  contents: read  # This is required for actions/checkout
Using IAM roles
For this approach, we need to create an IAM role instead of a user and provide GitHub with the role ARN. This approach is more secure as even if people get their hands on the role ARN, they won't be able to do anything with it, as we'll associate the role to a certain repo name and branch. We're going to use Terraform to create the IAM role. The process of how to create such a role can be found here.
We're going to create a Terraform module for it.
main.tf
# Create an IAM OIDC identity provider that trusts GitHub
resource "aws_iam_openid_connect_provider" "github_actions" {
  url            = "https://token.actions.githubusercontent.com"
  client_id_list = ["sts.amazonaws.com"]
  thumbprint_list = [
    data.tls_certificate.github.certificates[0].sha1_fingerprint
  ]
}

# Fetch GitHub's OIDC thumbprint
data "tls_certificate" "github" {
  url = "https://token.actions.githubusercontent.com"
}

# Create role for the action
data "aws_iam_policy_document" "assume_role" {
  statement {
    actions = ["sts:AssumeRoleWithWebIdentity"]
    effect  = "Allow"

    principals {
      identifiers = [aws_iam_openid_connect_provider.github_actions.arn]
      type        = "Federated"
    }

    condition {
     test     = "StringEquals"
      variable = "token.actions.githubusercontent.com:sub"
      # The repos and branches defined in var.allowed_repos_branches
      # will be able to assume this IAM role
      values = [
        for a in var.allowed_repos_branches :
        "repo:<YOUR-GITHUB-HANDLE>/${a["repo"]}:ref:refs/heads/${a["branch"]}"
      ]
    }
  }
}

# Assign policy to the role
resource "aws_iam_role" "github_actions_role" {
  name_prefix        = var.role_name_prefix
  assume_role_policy = data.aws_iam_policy_document.assume_role.json
}

resource "aws_iam_role_policy" "this" {
  role   = aws_iam_role.github_actions_role.name
  policy = <<POLICY
{
    "Version": "2012-10-17",
    "Statement": [
        {
            "Action": [
                "s3:PutObject",
                "s3:Get*"
            ],
            "Resource": "*",
            "Effect": "Allow"
        },
        {
            "Action": [
                "lambda:UpdateFunctionCode"
            ],
            "Resource": "*",
            "Effect": "Allow"
        }
    ]
}
  POLICY
}
variables.tf
variable "role_name_prefix" {
  type = string
}

variable "allowed_repos_branches" {
  description = "GitHub repos/branches allowed to assume the IAM role."
  type = list(object({
    repo   = string
    branch = string
  }))
}
outputs.tf
output "role_arn" {
  value = aws_iam_role.github_actions_role.arn
}
After creating the role, you can use the action like this:
- name: Configure AWS Credentials
  uses: aws-actions/configure-aws-credentials@v1
  with:
    role-to-assume: <role-arn>
    aws-region: ca-central-1
Any step after this step will have the permissions associated with the role.
Using GitHub Action secrets
For sensitive data, such as AWS credentials, we can use Action secrets on GitHub. To create a secret, you need to Settings > Secrets > Actions and create a new one. Then, in your action files, you can reference them like this:
${{ secrets.MY_SECRET }}
This way, you won't need to push your sensitive data into the repository.
Example (Python Lambda)
Here's an example of packaging and updating a Lambda function written in Python:
name: ci/cd

on:
  push:
    branches:
      - main

permissions:
  id-token: write
  contents: read

jobs:
  deploy:
    runs-on: ubuntu-latest
    env:
      BUCKET_NAME: bucket-name
      FOLDER_NAME: python-test

    steps:
      - name: GitHub checkout
        uses: actions/checkout@v2

      - name: AWS
        uses: aws-actions/configure-aws-credentials@master
        with:
          role-to-assume: ${{ secrets.ROLE_ARN }}
          aws-region: ca-central-1

      - name: Package
        run: |
          mkdir ./package && pip install -r requirements.txt -t ./package
          cd package && zip -r9 ../artifact.zip .
          cd ../ && zip -g artifact.zip *.py
          aws s3 cp artifact.zip s3://${{ env.BUCKET_NAME }}/${{ env.FOLDER_NAME }}/artifact.zip

      - name: Update
        run: aws lambda update-function-code --function-name python-test --s3-key ${{ env.FOLDER_NAME }}/artifact.zip --s3-bucket ${{ env.BUCKET_NAME }}
Example (Go Lambda)
Here's an example of packaging and updating a Lambda function written in Go:
name: ci/cd

on:
  push:
    branches:
      - main

permissions:
  id-token: write
  contents: read

jobs:
  deploy:
    runs-on: ubuntu-latest
    env:
      BUCKET_NAME: bucket-name
      FOLDER_NAME: go-test
      GOOS: linux
      CGO_ENABLED: 0
      GOARCH: amd64

    steps:
      - name: GitHub checkout
        uses: actions/checkout@v2

      - name: AWS
        uses: aws-actions/configure-aws-credentials@master
        with:
          role-to-assume: ${{ secrets.ROLE_ARN }}
          aws-region: ca-central-1

      - name: Set up Go
        uses: actions/setup-go@v2
        with:
          go-version: 1.19

      - name: Package
        run: |
          go build -o main .
          zip artifact.zip main
          aws s3 cp artifact.zip s3://${{ env.BUCKET_NAME }}/${{ env.FOLDER_NAME }}/artifact.zip

      - name: Update
        run: aws lambda update-function-code --function-name go-test --s3-key ${{ env.FOLDER_NAME }}/artifact.zip --s3-bucket ${{ env.BUCKET_NAME }}
Publishing Docker Images
Here, we're going to see how you can build your docker images on merge, and then push it to a remote registry. We're going to use both Docker Hub and AWS ECR (Elastic Container Registry).
Docker Hub
To user Docker Hub and push your images there, you need to have a valid account. So, head to hub.docker.com and create a free account (no need to upgrade to any paid plans).
Once you have your account set up, you can use the following command to login to Docker Hub:
docker login -u <YOUR-USERNAME> -p <YOUR-PASSWORD>
Your images need to be tagged in a certain way. Specifically, they need to be tagged like this:
<YOUR-USERNAME>/<YOUR-IMAGE-NAME>:<YOUR-IMAGE-TAG>
You can tag your images when building them using:
docker build -t <YOUR-USERNAME>/<YOUR-IMAGE-NAME>:<YOUR-IMAGE-TAG> .
You can also tag a pre-existing image with docker tag command:
docker tag SOURCE_IMAGE[:TAG] TARGET_IMAGE[:TAG]
Once you're logged in, and your image is properly tagged, you can push your image to your account using the docker push command:
docker push <YOUR-USERNAME>/<YOUR-IMAGE-NAME>:<YOUR-IMAGE-TAG>
Building GitHub action to push to Docker Hub
We can create a GitHub action to build and then push the image into our Docker Hub account:
name: build & push

on:
  push:
    branches:
      - main
    paths-ignore:
      - '**.md'

jobs:
  run:
    runs-on: ubuntu-latest
    env:
      REPO_NAME: <your-repo-name>

    steps:
      - name: GitHub checkout
        uses: actions/checkout@v2

      - name: ECR Login
        run: docker login -u ${{ secrets.DOCKER_HUB_USER }} -p "${{ secrets.DOCKER_HUB_PASSWORD }}"

      - name: Docker Build
        run: docker build -t ${{ secrets.DOCKER_HUB_USER }}/${{ env.REPO_NAME }} .

      - name: Docker Push
        run: docker push ${{ secrets.DOCKER_HUB_USER }}/${{ env.REPO_NAME }}:latest
AWS ECR
AWS ECR is a private registry for docker images. Before pushing your images there, you need a repository. Let's create that via Terraform:
resource "aws_ecr_repository" "repo" {
  name = "my-repo"
}
Once created, the AWS console will show you the commands you will need to use to prepare and push your images, including the step required for logging in. Just click on the View Push Commands on top right.
Here's a GitHub Action that uses the commands shown on the AWS console to push the image. Note that the role you're using mush have the necessary ECR permissions.
name: build & push

on:
  push:
    branches:
      - main
    paths-ignore:
      - '**.md'

permissions:
  id-token: write
  contents: read

jobs:
  run:
    runs-on: ubuntu-latest
    env:
      REPO_NAME: repo-name

    steps:
      - name: GitHub checkout
        uses: actions/checkout@v2

      - name: AWS
        uses: aws-actions/configure-aws-credentials@master
        with:
          role-to-assume: ${{ secrets.ROLE_ARN }}
          aws-region: ca-central-1

      - name: ECR Login
        run: aws ecr get-login-password --region ca-central-1 | docker login --username AWS --password-stdin <registry-address>

      - name: Docker Build
        run: docker build -t ${{ env.REPO_NAME }} .

      - name: Docker Tag
        run: docker tag ${{ env.REPO_NAME }}:latest <registry-address>/${{ env.REPO_NAME }}:latest

      - name: ECR Push
        run: docker push <registry-address>/${{ env.REPO_NAME }}:latest
Assignment 01
1. Install Terraform
Run terraform version in your terminal and you should be able to see the version installed on your system. If you haven't installed it yet, head to the installation page and follow the instructions for your operating system.
Terraform v1.2.8
on darwin_arm64
2. Initialize Terraform
Create a file named main.tf and initialize Terraform so it can work with AWS cloud.
3. What's wrong with this config?
Find out what's wrong with the following configuration, and how to fix it:
terraform {
  required_providers {
    aws = {
      source = "hashicorp/aws"
      region = "ca-central-1"
    }
  }
}
4. Create an S3 bucket
Create an S3 bucket using Terraform and enable both versioning and server side encryption. Refer to the Terraform documentation for S3 for help. Use AES256 for the encryption algorithm.
5. Verify your changes in S3 console
Verify that the bucket you created in the previous step has both versioning and server side encryption enabled by going to the S3 console, clicking on your bucket name, and then choosing the Properties tab.
Using the console, upload the same file twice and view all versions.
6. Create a virtual server
Create an EC2 Ubuntu instance of type t2.micro and configure the security group so that you can both SSH into it and access a web server on the HTTP port. After establishing the SSH connection, install an Apache server and change the /var/www/html/index.html file to the following content (You can use Vim or Nano to change the file):
<html>
    <body>
        <p>Your Name</p>
    </body>
</html>
Verify that your changes have been applied by visiting the public IP address of your instance in the browser.
7. Use EC2 user-data to automate the process
Instead of SSHing into your instance and change the /var/www/html/index.html, use EC2's user-data to automate the process.
8. Create 2 more instances with the same configuration
Instead of one EC2 instance, create 3, without any code duplication. Print out their public IP addresses at the end.
9. Learn about different EC2 instance types
Learn more about different offerings from AWS EC2, including their resources (vCPU and Memory) and their On-Demand hourly cost.
10. Use a variable for EC2 instance type
Instead of hard-coding t2.micro, read from a variable named instance_type. Explain various ways you can provide Terraform with a value.
11. Use variable validation
Use validation for your instance_type variable to only allow values of t2.micro or t2.nano. Use an appropriate error message if the type is something else. Refer to Terraform documentation for more info.
Hint: you need to use the contains built-in function. Read more here.
12. Structure your files
Separate your variables, outputs, and main configuration and have them in 3 different files: variables.tf, outputs.tf, and main.tf. Run terraform plan and make sure everything works and no change is needed for your infrastructure.
Assignment 02
1. Create an EC2 instance
Create a t2.micro EC2 instance and use the user_data field to install the Nginx web server to change the default page to show your name. Finally, add a created_by tag to the instance.
Note: To install nginx on an Ubuntu instance, replace apache2 with nginx in the code snippet from the lecture notes.
2. Create an S3 Terraform backend
Create an S3 backend with locking capabilities (using DynamoDB). For this, create a new folder at the top level named backend. Your file structure after this change should look like this:
project
└───backend
│   │   main.tf
└───live
    │   main.tf
    │   variables.tf
    │   outputs.tf
Configure Terraform to use this backend instead and move your state file to the backend (you shouldn't do this manually!). Finally, push your changes to a GitHub repository.
3. Contribute as a collaborator
For this exercise, you will pretend to be another member of the team. Clone the repo to a new folder and change the user_data field to show a different name; also, change the created_by tag to the new name. Apply your changes and make sure the page now displays the new name, and the console shows the new tag. Finally, push your changes to the repo.
4. Switch back to the main contributor
Switch back to the folder and configuration you created in the first step. Pull the latest changes from the repository (git pull), and do a terraform plan. Report the changes Terraform wants to make according to the plan.
Final
You are required to create a CI/CD pipeline using Terraform and GitHub actions to deploy a static website on AWS.
Requirements
- You need to customize the theme and replace the default name with yours (see the instructions below)
- The website needs to be behind CloudFront
- All the necessary infrastructure needs to be created using Terraform. Put the infra code in the
infradirectory - You don't need to to use a valid domain for the website; only the CloudFront HTTPS endpoint is required (e.g. https://dnrogbbpfg3z9.cloudfront.net/). Put the endpoint in the
README.mdfile in thecloudfront-endpointdirectory - The GitHub action needs to get triggered on merges
- The GitHub action needs to use an AWS role (created with Terraform) to authenticate
- Both bucket name and CloudFront distribution id need to be inserted into the action as secrets
Note
- You only need to change the default name. Feel free to customize the theme more, but it's not necessary. You can have everything else untouched
Important commands
npm installto install the modules after you cloned the reponpm startto run the website on the browser and see your changesnpm run buildto generate static files in thepublicfolder (you will need to copy the files in this folder to S3)
Theme Instructions
-
Start developing.
Navigate into your new site’s directory and start it up.
cd <SITE-DIRECTORY>
npm install
npm start
Your site is now running at
http://localhost:8000!
Customizing gatsby-config.js
All the information that appear on your resume is in this file. With solely changing the content of this file, you can customize the whole website. There's no need to change any other part of the code--although you're more than welcome to do so :)
-
Name, contact, and social media
name: `Luke Skywalker`,
role: `Software Developer`,
email: `luke@thelightside.com`,
socialMedia : [
    {"name": "github", "link": "https://github.com"},
    {"name": "linkedin", "link": "https://linkedin.com"},
    {"name": "facebook", "link": "https://facebook.com"},
    {"name": "twitter", "link": "https://twitter.com"},
    {"name": "instagram", "link": "https://instagram.com"},
  ],
You can simply delete any social link you want by removing the corresponding object (line) and it won't appear on your website. You can also add more social media links. This project uses the react-social-icons library. You can find the list of supported icons here.
-
About
about: `<p>The son of Jedi Knight Anakin Skywalker and Senator Padmé Amidala,
 Luke Skywalker was born along with his twin sister Leia in 19 BBY.</p>
 <p>More info <a href="https://starwars.fandom.com/wiki/Luke_Skywalker">here</a></p>`
Anything that you put here will appear under About page, which is the main page of the website. As you can see, you can also include
HTMLtags.
-
Education
education: [
      {
        degree: "B.Sc.",
        major: "Computer Engineering",
        when: "2008-2012",
        school: "UCLA",
        where: "Los Angeles, CA",
        moreInfo: `<p>I finally found out how it feels like to live in LA; it was awesome!</p>`
    },
]
Here you will add you educational background by appending similar items to the
educationarray. You can also remove fields you don't like (likemajor, or the name of theschool) and it won't appear on your website.
-
Experience
experience: [
        {
          role: "Software Developer",
          when: "2014-Present",
          company: "Facebook",
          where: "Menlo Park, CA",
          moreInfo: `See my work <a href="#">here</a>.`
      },
      {
          role: "Web Developer",
          when: "2010-2014",
          company: "Amazon",
          where: "Vancouver, BC",
          moreInfo: ``
      },
]
This is where you will talk about your experience.
-
Skills
skills: [
      {
        name: "JavaScript",
        level: "85",
        experience: "5 years"
      },
      {
        name: "Python",
        level: "75",
        experience: "2 years"
      },
]
You will specify your skill set here. The
levelparameter should be between 0 and 100.
-
Interests
  interests: [
	    "Reading",
	    "Programming",
	    "Playing the violin",
	    "Running",
	    "Watching Monty Python and the Holy Grail"
	    ],
Here you will list your Interests for the Interests page.
-
Themes
theme: "great-gatsby"This project comes with 5 themes:
great-gatsby: purple (default)master-yoda: light greenwonder-woman: light reddarth-vader: blackluke-lightsaber: light blue
-
Google Analytics
plugins: [
    // Make sure this plugin is first in the array of plugins
    {
      resolve: `gatsby-plugin-google-analytics`,
      options: {
        trackingId: "UA-111111111-1",
        head: true,
      },
    },
  ],
Add your Google Analytics tracking id here.
-
Fonts
font: "default"There are currently two fonts available:
defaultwhich uses theHelveticafont; andprogrammerwhich uses theIBM Plex Monofrom Google Fonts.
Changing profile photo and favicon
Simply replace the profile.png and favicon.ico files in the /static directory.